How to upload your Facebook Ads to AHS
Grabbing your Facebook Ads data
The second way is to connect your Author Helper Suite account with our Facebook App so we can automatically grab your Facebook ads data for you. IMPORTANT NOTE: The app will only download the last 7 days worth of data. So if you miss a week, you will still need to manually download from the Facebook Ads Manager.
Method 1: Manually Downloading/Uploading Facebook Ads data
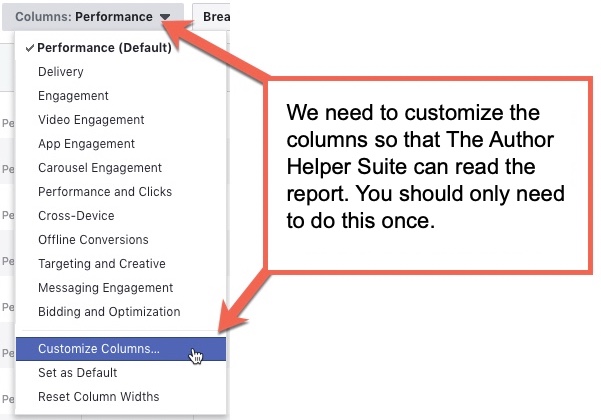
Step 1: In order to get an ROI, we need to have some ads data. Assuming you use Facebook ads, let’s jump over to your ads manager and get set up. Once there, click on the Ads tab and then view the dropdown (it is usually defaulted to Performance) and select Customize Columns.
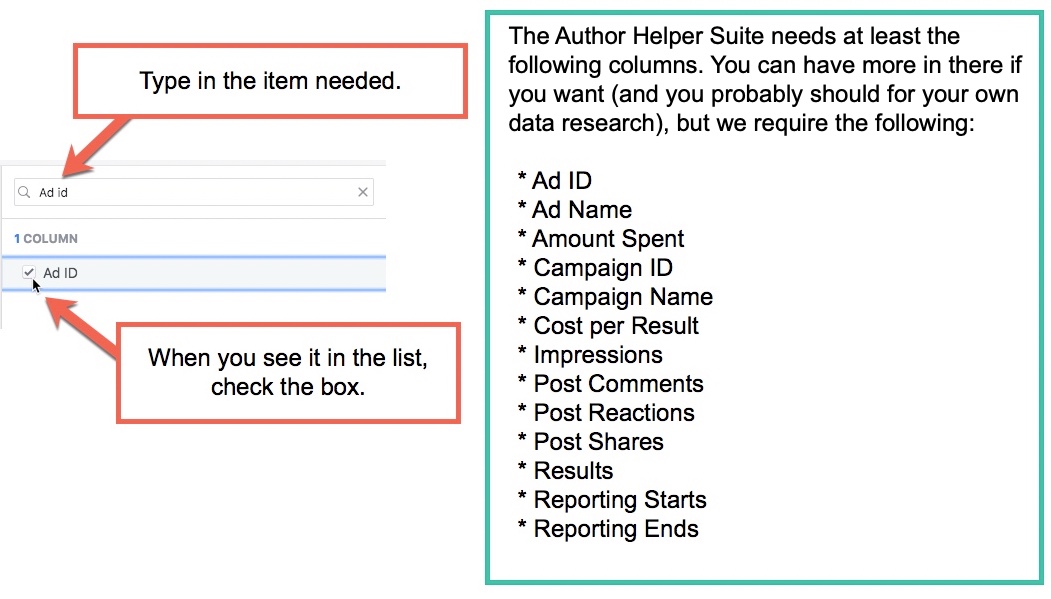
Step 2: Using the middle section of the window that pops up, verify that all of the items listed in the following image are showing up.
NOTE: You do not need to remove any columns from the list that are already present, unless you choose to. We just need to make sure that all the columns on the image below are there. Additional columns will not impact anything negatively.
Step 3: Once you have added all the required items, look at the bottom left of the window and you’ll see an option for Save As Preset. Click the checkbox and a field will appear for you to name the preset. Type The Author Helper Suite into that field and then click Apply.
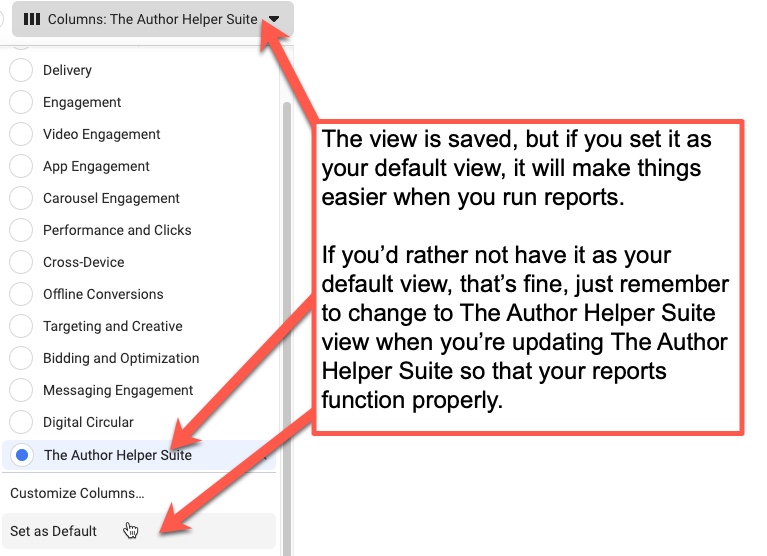
Step 4: We now have The Author Helper Suite view all set, but to make things easier for reporting, you can make it the default view. Doing this will make it so you don’t have to change the view to The Author Helper Suite every time you want to export your data. If you don’t want this as your default view, that’s fine but make sure you change it to The Author Helper Suite with each export.
Step 5: When you go to export a Facebook ads report for The Author Helper Suite, you need to verify three things.
- You’re on the Ads tab
- The columns view is set to The Author Helper Suite
- You’ve selected the correct date
If all three of these things are set, you’re ready to click the Reports dropdown and select Export Table Data.
Note: If you’re on the wrong tab or you don’t have the The Author Helper Suite column view selected (or it hasn’t been configured correctly), you’ll get an error when uploading to The Author Helper Suite.
Uploading by date range
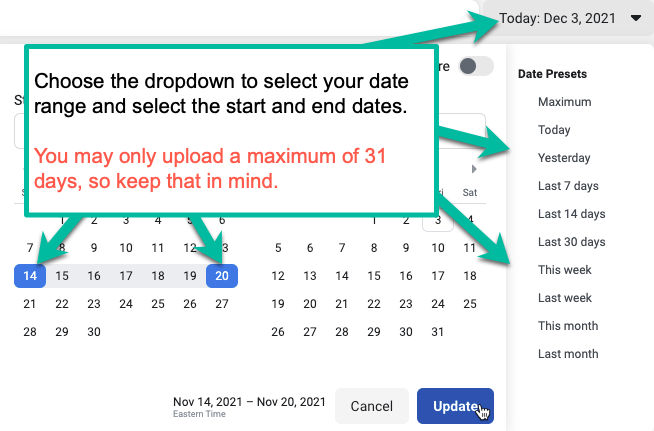
You may also upload your ads report by date range (up to 31 days). Follow these steps for details…
First, choose the date range. If you select more than 31 days, The Author Helper Suite system will give you an error.
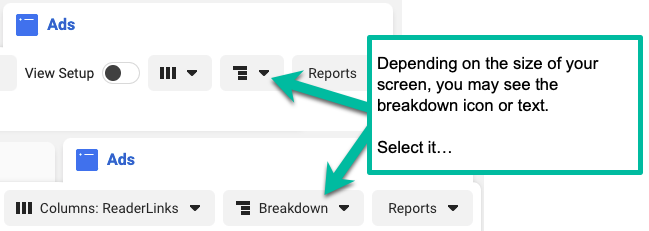
Next, choose the Breakdown tab.
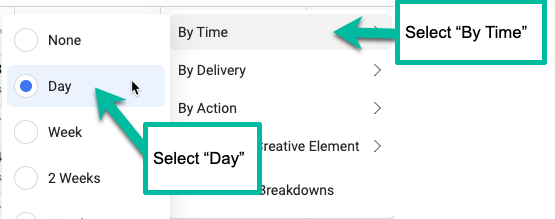
Set the breakdown to be BY TIME and DAY.
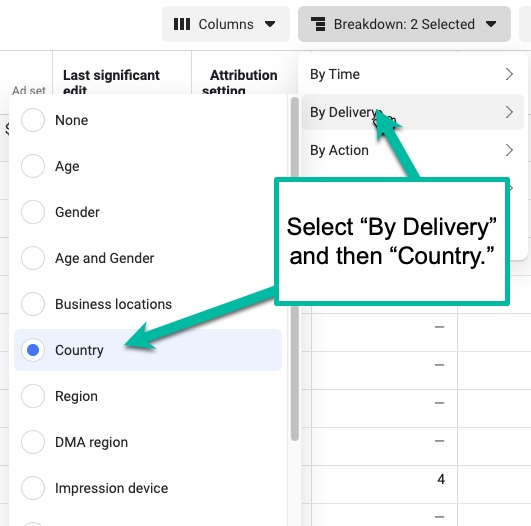
If you also want to be able to filter on the main charts by country, and see your Facebook ads data broken down accordingly, make sure to also filter by country.
Continue on to the next step, doing the exports as normal and then upload to The Author Helper Suite system.
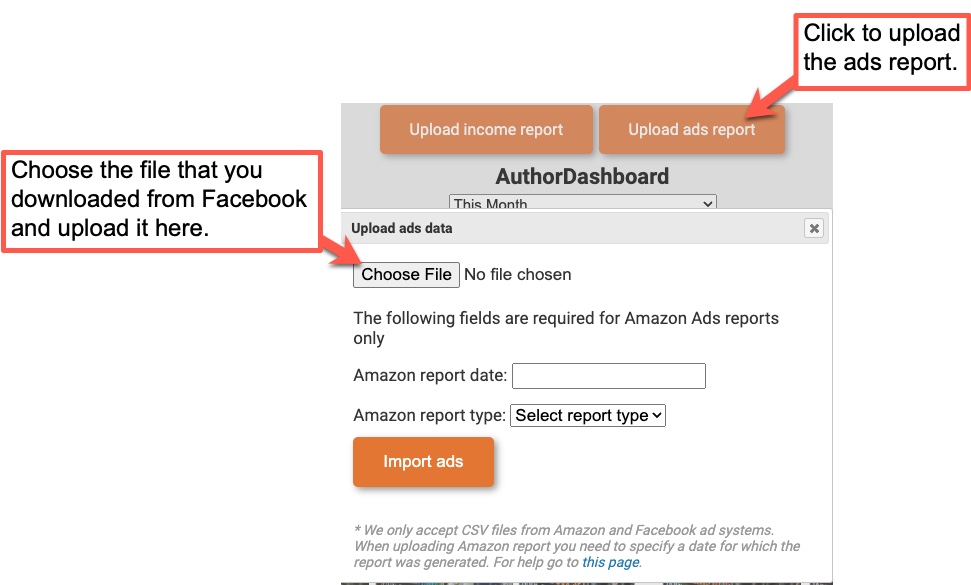
Step 7: Now go back to The Author Helper Suite and click the Upload ads report button at the top. Choose the file you just downloaded from Facebook and upload it to The Author Helper Suite. If you set up everything correctly, it should upload without a hitch.
Step 9: Now that you have the Facebook ads data imported, you can head to the Homepage or Book pages and check out your ROI. You’ll need to upload multiple days for this to be accurate, of course.
Method 2: Using the AHS Facebook App To Get Your Ads Data
Step 1: Click the Import Facebook Ads button on the home page.
Step 2: Authorize the AHS Facebook App.
Step 3: If you have multiple ads accounts, you’ll need to select the one that you plan to use on AHS. NOTE: We only support one connection.
Step 4: Verify that everything looks right before you import your data. If it does, click the import button and do a little happy dance.
Step 5: You’re all set, so you can jump back to the home page and continue about your day. NOTE: Please remember that the AHS Facebook App can only import back 7 days, so make sure you do the importing every few days so you can avoid having to manually download/upload your reports.
Related Articles
How do I upload Amazon Ads report to AHS?
When you go to the AMS sign-in page you are met with the question, “What country are you advertising in?” Please select the country you are paid in so that the correct currency is displayed in your reports. In order to get your ads reports for Amazon ...I'm an international author. How does The Author Helper Suite handle Amazon, Facebook Ads, AMS Ads, and other critical data?
AHS supports international authors with the following: You can choose your AHS currency for Australia, Canada, US, GB and Euro. The following reports can be uploaded as-is, with no manual conversion required of you: Amazon KDP from all countries can ...My Amazon Ads reports are showing the wrong currency in AHS.
Your Amazon Ads currency setting must match your AHS currency setting. Amazon does all of the currency conversion on their end, so as long as AHS's currency is set the same you'll get accurate conversion. When you hit the sign-in page for AMS you are ...My Facebook Ads report won't upload to ReaderLinks
The most common reason for this is the Campaign Name column missing from the report. The reason for this is when the Facebook custom report is not crafted from the Ads tab on Facebook, the final report doesn't include the Campaign Name data. To fix ...How can I delete an ads report?
You can delete ads by doing the following: 1. Select Account/Subscription from Settings. 2. On the Settings page, click 'Remove Ads Data' tab. 3. In either the Facebook or the Amazon section, enter the date for the ad report you'd like to delete and ...
